Schedule Batch Jobs for Performance in Business Central April Release

Scrolling though my Twitter feed today I saw this from tweet from Roberto Stefanetti :-

This feature actually has a far more important use for all of us especially in the SaaS solution. So I thought I would point it out if you have not figured it out for yourself.

In on-premise NAV/BC sites, when I get a call to look at a performance issue, there are two things that I check first in the application setup itself :-

  1.  Inventory Setup->Automatic Cost Adjustment must be set to Never. This makes sure when posting a transaction that affects inventory value, the system does not post additional transactions on top of the one being posted to reflect the change in inventory value.
  2. Analysis Views->Update on Posting must be set to No. for all of them.  This one effectively updates a reporting cube in the background if a transaction that is being posted affects it.

In my experience I cannot see any good functional reason for either of these to be updated in a system during normal working hours.  Why add more work for the system to do while others may be trying to get exclusive use of the same tables ?

Usually, I recommend scheduling these updates with a modification to call the underlying Codeunits that action Adjust Cost Item Entries / Post Cost Inventory Cost to G/L and Update Analysis Views from my toolbox so these are run via NAS / Job Queue / Web Service (whatever weapon suits the version the customer is on) overnight.

Even if the users are reporting against Analysis Views for end of month reporting and need to have them refreshed a few times during this period the cost of refreshing it once or twice (if absolutely needed), will be far less than having an automated update being triggered by whoever is trying post something on the shop floor.

So what now ?

In the April release we can now schedule either of these functions to be updated by using the scheduling feature directly from the Adjust Cost Item Entries Report or Update Analysis Views Report. It’s out of the box ! No developer toolbox required !

You can set this up with the following steps :-

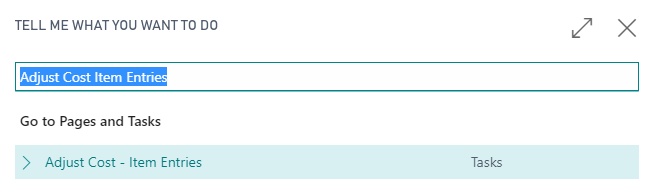
  • ALT+Q -> Search for Adjust Cost Item Entries

05-01-Adjust Cost

  • Select any filters you require and select Schedule

05-02-Adjust Cost

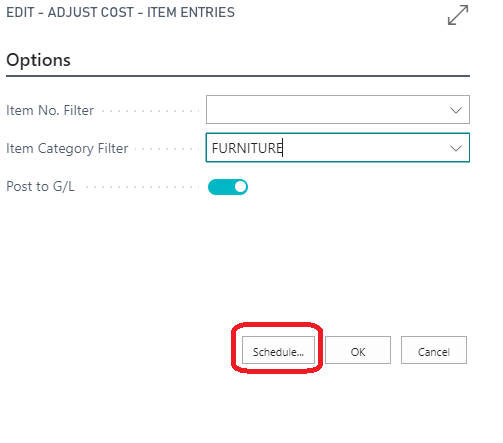
  • Edit the Description so that you can identify it in the Job Queue, enter a value for Next Run Date Formula and the Earliest Start Date/Time field

05-03-Adjust Cost

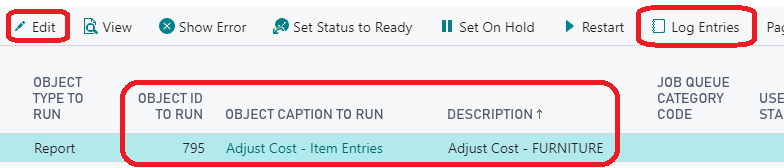
  • Check that the Job Queue Entry has been created by pressing ALT+Q and search for Job Queue Entries

05-04-Job Queue Entries

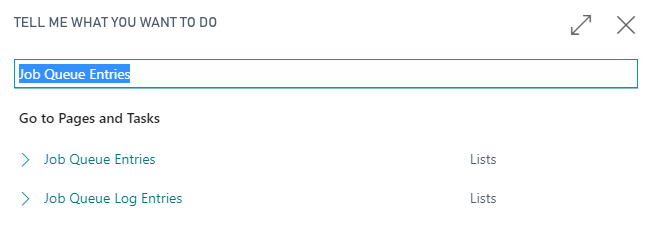
  • Notice that the there is a new Job Queue Entry record created with the description that was entered previously.  You can now Edit the Job Queue or View it’s Log Entries just like a normal Job Queue.

05-06-Job Queue Entries

In the future…

We don’t know what tools we are going to get to troubleshoot performance issues in the SaaS solution in the future. There will most certainly be performance issues, and how we will solve them is anyone’s guess. I would rather setup a system to avoid known issues, be a good cloud citizen and not cause a loss of sleep for @KennieNP

/cal;

AAD Password Grant PowerShell class for use with Business Central

After my post yesterday, I have a quick way to register Business Central APIs for AAD authentication. That’s working well and I can use Postman to test APIs but I need to be able to call APIs in PowerShell.

After a lot of time spent reading Microsoft articles on OAuth 2.0 like this and some articles on Graph, I Googled around the problem and found a solution on reddit/r/PowerShell.

The result is a class that you can use to get the authentication token using a password grant request.

It’s on my GitHub and below :-

#  References.
#  https://docs.microsoft.com/en-us/azure/active-directory/develop/v1-protocols-oauth-code
#  https://www.reddit.com/r/PowerShell/comments/9clts3/powershell_automation_with_oauth2/
#

#
# Class to get an OAuth 2.0 authentication token from BC using a Password Grant.
#
class AADPasswordGrant {
    [string]$token                  #Token that we need to get to Authenticate with later
    [string]$tenantId               #BC Tenant ID
    [string]$clientId               #The ApplicationId that was registed for BC in AAD.   
    [string]$username               #BC username
    [string]$password               #BC Password 
    [System.Security.SecureString]$securePasswordStr #BC Password we will convert to a secure string later
    [string]$securePasswordBStr     #BSTR version of the secure password  
    [string]$clientSecret           #Key that was generated when registring BC in AAD
    [string]$grantType      = "password"  #This must be password so we are not challenged or have to use a form.  
    [string]$callbackUrl    = "https://businesscentral.dynamics.com/"              #The same callback registered for BC in AAD
    [string]$accessTokenUrl = "https://login.windows.net/{tenantId}/oauth2/token"  #Url to request the token from
    [string]$resourceUrl    = "https://api.businesscentral.dynamics.com"           #The resource we want to talk to
    [string]$scopeUrl       = "https://api.businesscentral.dynamics.com"           #The resource we want to talk to
   
    AADPasswordGrant([string]$tenandId, [string]$clientId, [string]$clientSecret, [string]$userName, [string]$password) {
        $this.tenantId     = $tenandId
        $this.clientId     = $clientId
        $this.clientSecret = $clientSecret
        $this.userName     = $userName
        $this.securePasswordStr  = (ConvertTo-SecureString -String $password -AsPlainText -Force)
        $this.securePasswordBStr = [System.Runtime.InteropServices.Marshal]::PtrToStringAuto([System.Runtime.InteropServices.Marshal]::SecureStringToBSTR($this.securePasswordStr))
        $this.accessTokenUrl     = $this.accessTokenUrl.Replace('{tenantId}', $tenandId)
    }

    [void]TryGetAuthorisationToken () {
        $body = @{
            grant_type    = $this.grantType
            username      = $this.userName
            password      = $this.securePasswordBStr
            client_id     = $this.clientId
            client_secret = $this.clientSecret
            scope         = $this.scopeUrl
            redirect_uri  = $this.callbackUrl
            resource      = $this.resourceUrl
        }
        $authResult = Invoke-RestMethod -Method Post -Uri $this.accessTokenUrl -Body $body
        $this.token =$authResult.access_token
    }
}

You can test the class with the code below, using a BC tenant of your own. The values here are, of course, fudged and provided for example only.

#
# Test the Class Here
#
$tenantId     = 'fa75f4db-5231-6eb5-9ec4-ddb74cd648e'      #Your BC tennantID
$clientId     = 'b94639c8-553a-6a7d-ad54-d36463d3729'      #The id that BC is registered with in AAD  
$clientSecret = '5P00Zg29GGg6rnllUg0Fad9SSFC8lWVGJyOnsF0=' #The secret key that was created when registering BC for AAD Auth
$username     = 'bcuser@domain.onmicrosoft.com'            #Username for the passowrd grant
$password     = 'user.password@1234'                       #Password in plain text

[AADPasswordGrant]$aadPasswordGrant = [AADPasswordGrant]::new($tenantId, $clientId, $clientSecret, $username, $password)
$aadPasswordGrant.TryGetAuthorisationToken()

$companiesUrl = "https://api.businesscentral.dynamics.com/v1.0/api/microsoft/automation/beta/companies"
$requestHeaders = @{ 'Authorization' = 'Bearer ' + $aadPasswordGrant.token }
$result = Invoke-RestMethod -Uri $usersUrl -Headers $requestHeaders -Method Get
$result.value | Out-GridView

Hope it helps you out

/cal;

Use PowerShell to setup AAD Authentication for Business Central APIs

After spending some time trying to play with the Automation APIs for BC it became clear that using the Basic Authentication with Username and Password was not going to work for me.

I have read Vjeko’s article: How do I: Really set up Azure Active Directory based authentication for Business Central APIs and know that navcontainerhelper does setup AAD authentication setup for you.

I will probably have to set this up a few times for colleagues and clients, so I thought that it would save a bit of time in the future if I hacked this script together from Freddy’s work and tested its usage with the help of Vjeko’s article.

Thanks and credit to Vjeko and Freddy for their efforts.

I have it on GitHub here

You will need to install Nuget Package Provider the AzureAD Package (if you dont have them already)

Install-PackageProvider -Name NuGet -MinimumVersion 2.8.5.201 -Force -WarningAction Ignore | Out-Null
Install-Package AzureAD -Force -WarningAction Ignore | Out-Null

You can now use the script below to setup for your BC tenant

$bcAppDisplayName = "BC OAuth 2.0"
$bcSignOnURL      = "https://businesscentral.dynamics.com/"
$bcAuthURL        = "https://login.windows.net/{bcDirectoryId}/oauth2/authorize?resource=https://api.businesscentral.dynamics.com"
$bcAccessTokenURL = "https://login.windows.net/{bcDirectoryId}/oauth2/token?resource=https://api.businesscentral.dynamics.com"

function Create-AesKey {
    $aesManaged = New-Object "System.Security.Cryptography.AesManaged"
    $aesManaged.Mode = [System.Security.Cryptography.CipherMode]::CBC
    $aesManaged.Padding = [System.Security.Cryptography.PaddingMode]::Zeros
    $aesManaged.BlockSize = 128
    $aesManaged.KeySize = 256
    $aesManaged.GenerateKey()
    [System.Convert]::ToBase64String($aesManaged.Key)
}

$AesKey = Create-AesKey

# Login to AzureRm
$AadAdminCredential = Get-Credential
$account = Connect-AzureAD -Credential $AadAdminCredential
$bcDirectoryId = $account.Tenant.Id

#Delete the old one if it is there
Get-AzureADApplication -All $true | Where-Object { $_.DisplayName.Contains($bcAppDisplayName) } | Remove-AzureADApplication

#Create New One
$ssoAdApp = New-AzureADApplication -DisplayName $bcAppDisplayName -Homepage $bcSignOnURL -ReplyUrls ($bcSignOnURL)

# Add a key to the AAD App Properties
$SsoAdAppId = $ssoAdApp.AppId.ToString()
$AdProperties = @{}
$AdProperties["AadTenant"] = $account.TenantId
$AdProperties["SsoAdAppId"] = $SsoAdAppId
$startDate = Get-Date
New-AzureADApplicationPasswordCredential -ObjectId $ssoAdApp.ObjectId `
                                         -Value $AesKey `
                                         -StartDate $startDate `
                                         -EndDate $startDate.AddYears(10) | Out-Null
#
#Set the permissions
#

# Windows Azure Active Directory -> Delegated permissions for Sign in and read user profile (User.Read)
$req1 = New-Object -TypeName "Microsoft.Open.AzureAD.Model.RequiredResourceAccess" 
$req1.ResourceAppId = "00000002-0000-0000-c000-000000000000"
$req1.ResourceAccess = New-Object -TypeName "Microsoft.Open.AzureAD.Model.ResourceAccess" -ArgumentList "311a71cc-e848-46a1-bdf8-97ff7156d8e6","Scope"

# Dynamics 365 Business Central -> Delegated permissions for Access as the signed-in user (Financials.ReadWrite.All)
$req2 = New-Object -TypeName "Microsoft.Open.AzureAD.Model.RequiredResourceAccess" 
$req2.ResourceAppId = "996def3d-b36c-4153-8607-a6fd3c01b89f"
$req2.ResourceAccess = New-Object -TypeName "Microsoft.Open.AzureAD.Model.ResourceAccess" -ArgumentList "2fb13c28-9d89-417f-9af2-ec3065bc16e6","Scope"

Set-AzureADApplication -ObjectId $ssoAdApp.ObjectId -RequiredResourceAccess @($req1, $req2)

#Write out information for the developer
Write-Host "AesKey / Client Secret" $AesKey
Write-Host "Directory Id" $bcDirectoryId
Write-Host "Application Id / Client ID" $ssoAdApp.AppId
Write-Host "Call Back Url" $bcSignOnURL
Write-Host "Auth URL" $bcAuthURL.Replace('{bcDirectoryId}', $bcDirectoryId)
Write-Host "Access Token URL" $bcAccessTokenURL.Replace('{bcDirectoryId}', $bcDirectoryId)

/cal;

BC Development on macOS

I’m sure that in the near future, development for BC will not be tied to Windows machines, so I’m working on alternative development platforms. There are a few missing pieces at the moment, but I think that this will improve over time.

My home machine is an older iMac that is only used for photography, so I thought that it would be perfect for my first go at an alternative setup.

Some of the setups are just like Windows, but I’m going to go from beginning to end.

What do you need ?

  • Chrome.  I use Chrome for all browsing and development and is my default browser on both my iMac and Windows machine.  I have not tested this with Safari or other browsers.
  • A BC tenant with a Sandbox.  I created a new one from https://trials.dynamics.com/
  • An Atlassian ID and Bitbucket.org cloud account so you can install Sourcetree. I first heard about this from reading this blog post from @gunnargestsson. You can get this from https://bitbucket.org

Show all files

macOS has its roots in Unix and by default Finder will not show dot files or dot directories as these are reserved for settings in the Unix world.  This is an issue for a BC developer as folders like .vscode or .alpackages are not shown by default. So we have to change it.

  • Open Terminal to get to a shell and enter the command to change the environment variable required.
defaults write com.apple.finder AppleShowAllFiles YES
  • Open Finder and select Force Quit Finder.

00

  • Then select Finder and Relaunch.

0

VS Code

Now we need our IDE. And we are fortunate that there is an install available for macOS.

1

  • Unzip the file and move it to the Applications folder.

2

  • You can now search for  Visual Studio Code in Spotlight. Open it and select the option to Keep In Dock so you can get to it quickly later

3

  • In VS Code open the Extension Marketplace by pressing Cmd+Shift+X  and  search for AL Extension to install it.

4

  • Close and Reopen VS Code so that it loads the AL Extension.
  • Open the Command Palate by selecting Cmd+Shift+P and select AL:Go! to create a Hello World Project.

5

  • Press F5 to Publish to and select Microsoft cloud Sandbox. Keep reading for some issues at the end of the post.

6

  • Next VS Code will authenticate with your Sandbox. If your credentials are not cached a prompt is displayed and you can select Copy and Open to open a browser and copy the authentication code.

7

  • If your credentials are cached the Debug Console will give you a URL and code to manually put into the browser

8

  • Either way enter the code that VS Code gives you to authenticate

9

  • Next you need to login to the BC Sandbox

10

  • And we have an Extension on macOS!

11

Sourcetree

Again we are fortunate that Atlassian also release a version for macOS

12

  • Unzip the app and put it in the Applications folder, search for it in Spotlight, open it and select the Keep in Dock option so you can get to it quickly later.
  • When installing you need to have your Atlassian ID that you created for a Bitbucket cloud setup. Select the Bitbucket Cloud option and follow the bouncing ball to register

13

  • You will also need to allow macOS to have access to your Bitbucket account.

14

  • Since GitHub is allowing unlimited free private repositories these days, I’m going to put all of my blog and private code there. To do this you need to change your account setup in Sourcetree
  • Go to the Settings icon and select Accounts.

15

  • Delete the Bitbucket setup the the installer puts in and add a new server for Git Hub. I selected OAuth as the Auth Type and SSH as the Protocol.  Use the buttons to generate a SSH Key  and copy it to your clipboard for later. Lastly, select the button to Connect Account to get the OAuth access to your GitHub account.

16

  • In the browser select Authorize atlassian

17

  • Login to GitHub and go to account settings, SSH and GPG Keys. Paste in the SSH Key that was generated in the previous step.

18

  • To create a repository do it from the GitHub site

19

  • Sourcetree can now see my remote repository

20

  • I can now clone it to a local drive and put it into some files into it and commit it with Sourcetree.

21

What’s wrong with it ?

  • Well this works for me.  On Windows or macOS I prefer to get the extension fleshed out before I commit anything.  This may not work for you.
  • The obvious one is an RDLC editor.  I cannot find any open source projects or VS Code extensions that will edit the RDLC, so reports are going to have to stay on Windows for now.
  • Shortcuts are a bit annoying. F7 to F12 on my Mac keyboard are bound to things like Back and Volume controls. So you need to use the menu with setting breakpoints or debugging code. This will take a bit of getting used to.
  • I had an issues creating a repository on GitHub directly from Sourcetree. Something about my organization that I’m not sure where it comes from. For now I’m happy to do setup on GitHub and then clone.

30

  • Using HTTPS as the protocol to connect to GitHub did not work when I needed to Push from Sourcetree to my remote repository I kept on getting 403 errors. I did some googling and found that it might be a GitHub thing, but changing to use SSH worked for me

Updating a PowerShell module

I needed to update my navcontainerhelper to be able to use the new features that Freddy had blogged about here and in this tweet :-


To do that I did the following :-

I checked my current navcontainerhelper version by running the below commands from an elevated PowerShell ISE

Import-Module navcontainerhelper
Get-Module navcontainerhelper | Select Version

The output told me I was running a rather old version : 0.3.1.4

Version
-------
0.3.1.4

So, to update it I uninstalled and reinstalled it with :-

Uninstall-Module navcontainerhelper -RequiredVersion '0.3.1.4'
Install-Module navcontainerhelper

After accepting the warnings and then closing and re-opening my PowerShell ISE, I could check that my version had been updated by running the Import-Module and Get-Module from my first step.

Version
-------
0.5.0.6

I have had to used this method to update some of my Office 365 and Azure PowerShell modules in the past to get access to some of the new commands.

Now to experiment with running tests using the new navcontainerhelper commands…

/cal;